Monday, July 12, 2010

Aliens and Planets


This activity needs to be done over a series of 3 or 4 lessons. One lesson to make the paper, one lesson to create the alien and one or two lessons to put everything together. It is messy so requires an art smock and students need to be told that the food dye will stain their hands until they wash them a few times so be careful not to get it on your skin.


Materials

Food dye (ready made or powder which has water added to it)

3 pieces of A4 paper

Icing sugar and water solution

Salt

Paint brushes

2 pieces of A3 white and one A3 black paper

Star and circle cutters

Coloured pencils/textas

HB pencil


Procedure

-Before any dye is put on make sure the students name is on the back of each A4 piece of paper

-Take one piece of A4 paper. Scrunch it up into a ball repeatedly until the paper starts to become soft but try not to rip it. Then paint it with the food dye (one or multiple colours). Leave to dry

-Paint the second piece of A4 paper with one or multiple colours of food dye. While it it still wet sprinkle salt over the paper. Leave to dry then scape the salt off. The salt soaks up part of the dye leaving a pattern on the paper.

-Paint the third piece of paper with the icing sugar solution. Then use the paint brush to add drops of dye to the paper. Tilt the paper to let the dye run on the page. Leave to dry.

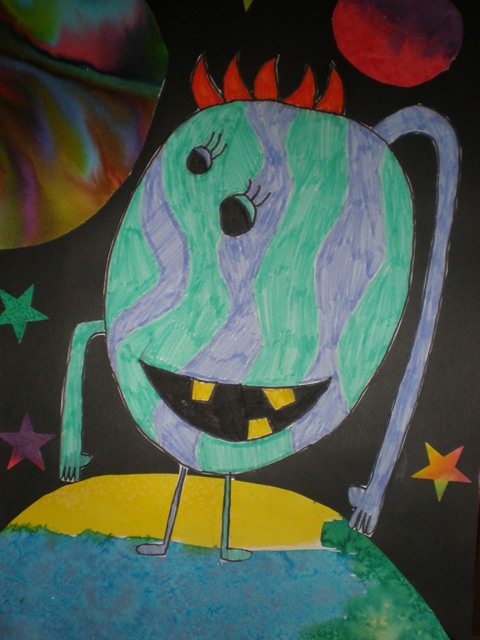
-Fold one piece of A3 paper into quarters. in each quarter ask students to create their own alien. It may have lots of arms, lots of eyes or antennas. Provide some sample pictures of aliens for students to get ideas from. Draw the aliens in pencil then outline in black texta and colour in in either texta or pencil

-Once students have drawn their 4 aliens ask them to choose their favourite and draw it up on the an A4 piece of paper trying to take up most of the space. Once completed cut out.

-Using the 3 pieces of died paper cut out some planets. These will be stuck onto the black A3 paper A semi circle can be cut out to use at the bottom of the page. This is the planet that the alien will stand on. Circle for planets in the background can either be drawn onto the paper and cut out or cut out using a round cutter. Stars can also be cut out using the cutter.

- Once planets, stars and the alien is cut out they can be arranged on the A3 black paper and stuck on.


Icing sugar solution paper


Scrunched paper


Salt Paper
Alien Drafts
Mr Men Mono prints


This projects requires students to have completed some Mr. Men drawings previously. Once this has been done the student can select their best Mr Men picture to trace onto an A5 piece of paper. As this activity uses paint an art smock is definitely required. Also as rollers can be quite expensive it is important to ask students to use them carefully and make sure that they clean them after use.


Materials
Mr Men drawing
5 pieces of A5 paper
HB pencil
Printing foam (meat trays also work well if the budget is limited)
Paint, roller and a container for the paint


Procedure
-Students choose their favourite Mr Men drawing out of the four that they previously drew
-Place a piece of A5 paper over this drawing and trace it. Note: If there is writing make sure that this is not traced but written onto the A5 paper backwards as this will ensure it is the right way when it is printed.
-Place the traced picture onto a piece of printing foam and fix into place using sticky tape.
- Using a sharp pencil or pen redraw over the image to imprint it onto the foam. Once this is done remove the A5 paper. If the lines in the foam are not very deep draw over them again in the foam but be careful not to put the pencil all the way through the foam.
-Use a roller to roll paint evenly and not too thick over the printing foam
-Place a piece of A5 paper over the printing foam stamp and use the palm of your hand to rub the back of the paper
- You will start to see the paint through the back of the paper. Lift the paper off to reveal the Mr Men print
-Repeat this using 3 other pieces of paper. Experiment with colour and amount of paint to get different effects


The template is the reverse of the final print
Mr Men Drawing


Mr Men are fun characters for children to draw as they are bright, simple and have a basic shape which children will be familiar with such as a circle, square or triangle. Before beginning this activity talk with the students about the different shapes they can see in the Mr Men. Also discuss that some characters may be better drawn landscape and others portrait depending on their shape. This activity come with a set of criteria which can be used to explicitly let students know what is expected of them.


Materials

A3 paper

HB pencil

Coloured pencils or textas

Mr Men and Little Miss books


Procedure

-Fold the A3 piece of paper into quarters then unfold

-Refer to the criteria and go through each point with the students

-Ask students to select a Mr Men or Little Miss book so they can draw the character from the front cover in one of their squares.

-In the end students should have two Mr Men pictures and two Little Miss pictures in the four squares


Portrait
Drawing a portrait by copying a picture may be a daunting task for many people. However this activity makes the task a lot easier by breaking down the picture being copied into sections and focusing on the lines and shading in a small section rather than the whole picture. Before doing this activity students will need the basic knowledge of shading, the different tones that different grey leads make and how to use different pencils to get a shadow effect. Pencils can be explored by doing a view finder activity where students cut out a small square out of the middle of an A5 piece of paper. Students then place the viewfinder over a section of a black and white portrait picture. Students then experiment with different pencils to copy this section of the picture.
Materials
Various grey lead pencils (HB, 2H, 2B, 4B, 6B, 8B)
Magazine picture of a face (A4 size)
A4 paper
Procedure
- Hold an A4 black and white magazine photo so it is portrait orientation. Fold it in half so that the top edge and bottom edge meet then unfold it.
-Fold the upper half of the paper so that the top edge meets the line in the middle then unfold.
-Fold the bottom half of the paper so that the bottom edge meets in the middle then unfold.
-Turn the photo so it is landscape orientation and repeat the folding process. The end result should be the photo being in 16 sections.
-Repeat the folding process using a blank A4 piece of paper.
- Fold up the magazine photo so that only the first square is showing
-Using the grey lead pencils draw the lines that are seen in this square into the first square on the blank piece of paper. Use shading to create the shadows.
- Once the first square is done move onto the next and continue until the whole picture is copied
- When the portrait is completed compare it to the baseline data to see the improvement.


Picture to be copied


Finished Portrait


Sunday, July 4, 2010

Base Line Data


Base line data is used to see what a student already knows. In this case it was used to see how well a portrait could be drawn. Base line data is compared to future work samples to see how much of an improvement has been made.

Materials
A3 paper
Various grey lead pencils (HB, 2B, 4B, 6B, 8B, 2H)

Procedure
- Ask students to draw a portrait of themselves. Do not give any other guidelines to the students as the point of this is to see what students can do without assistance
- Tell students to keep this drawing as it will be looked at later on
Butterfly Embossing


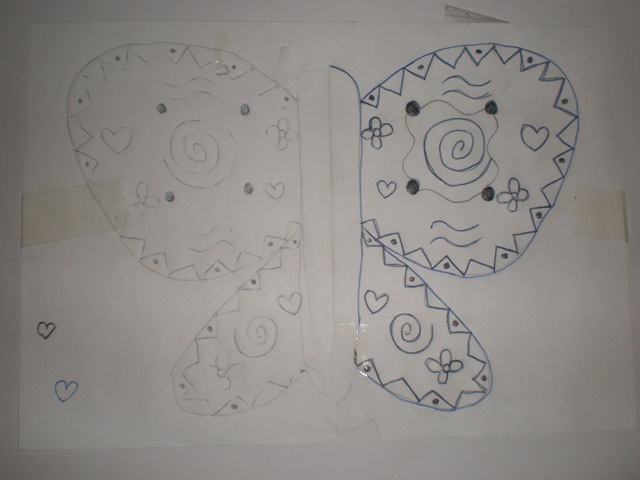
This craft activity requires some pre-work to be done to allow it to work smoothly. This includes exploring patterns and sharing different pattern ideas between students.

Materials
Paper
Pencil
Pen
Embossing foil
Thin wire
Beads
Aluminium wire
Candle
Hot glue gun

Procedure
-Fold a A5 piece of paper in half.
-Draw half a butterfly on one half of the paper
-Fold the paper in half along the preexisting crease
- Hold the paper up to a window with the side that is not drawn on facing out. Trace the butterfly half onto this half of the paper and unfold the paper to show a full symmetrical butterfly.
-Decorate one half of the butterfly using various patterns
-Place the butterfly design on top of embossing foil and fix it in place with tape. Using a pen draw over the patterns and outline of the butterfly pressing firmly to make an imprint on the foil.
Once this is done for one half flip the butterfly design template over to draw the other half of the butterfly.
-Cut out the butterfly from the embossing foil
- Thread some beads onto thin wire (about the same length as the middle part of the butterfly) to make the body. Attach to the foil using glue gun.
- Wrap aluminium wire 2 or 3 times around a candle.
- Curl the remaining wire around the candle using a pencil to curl it.
- Attach the end of the wire to the butterfly using hot glue


Pattern template which is laid over embossing foil. Pattern is traced over to imprint the embossing foil.


Butterfly attached to candle


Pattern imprint on embossing foil. Beaded body


Upside Down Drawing


This activity involves drawing sections of a picture rather than the whole picture. This makes it easier to see the picture as just lines rather than a complete drawing.

Materials

Envelope

A3 paper

A3 image

HB pencil


Procedure

-Students collect an envelope containing a picture

-Student must pull only a few centimetres of the picture out of the envelope.

-Student draws the lines that they can see in that section of the picture

-A few more centimetres of the pictures id pulled out to be drawn

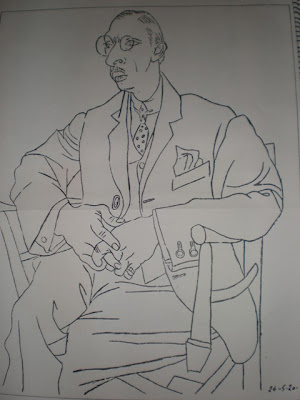
-The end result will be a picture of a man upside down


The image to be pulled out of the envelope


The finished drawing