Monday, July 12, 2010


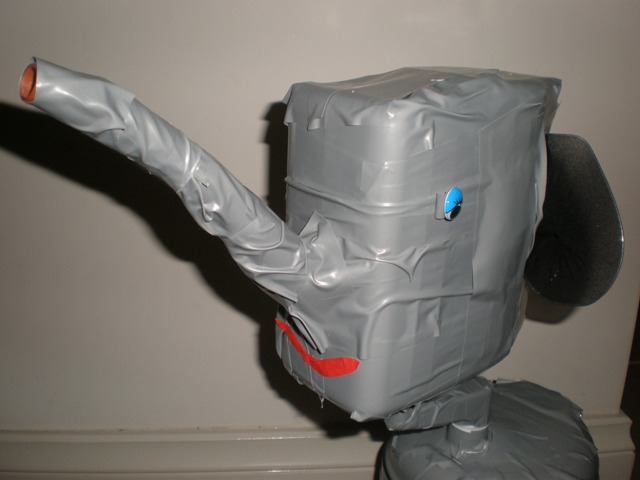
Found Object Sculpture


Art can come in many forms. By using simple objects such as old kitchen ware, old toys or things bought from an op shop or tip shop a sculpture can be made. The materials and procedure for a found object sculpture will vary depending on what is being made. Bellow are the instructions on how I made my elephant sculpture.


Materials


Watering can


Salad spinner


4 little glasses


Grey tape


Googly eyes


Red paper


Stockings


Wire


Glue gun


Wool


Procedure


-Stick the glasses, which will be the legs, to the bottom of the salad spinner using grey tape


-Stick the watering can head to the handle of the salad spinner using grey tape


-Wrap grey tape around the watering can and salad spinner to be the skin


-Attach the eyes using a hot glue gun


-Cut out a mouth shape from the red paper and glue this on


- Tightly roll some grey tape into a long worm shape to be the tail and attach to the rear. Small pieces of wool is attached with grey tape to the end of the tail.


- Make the ears by stretching a stocking over the wire and tying in a know at the end. Attach the ear to the head using grey tape
Model Magic Butterfly


Students use a combination of model magic and decorated paper to make thier own butterfly.


Material
One packet of model magic per student
A4 dispersing paper
Food dye
paint brush
Water
Thin Wire
Paint
Scissors
Squirty bottle'
Sticky tape
Hot glue gun

Procedure
- With the fluffy side of the dispersing paper facing up, dampen the paper using the squirty bottle
- Dip a paint brush into food dye and add different coloured drops of dye onto the paper until the whole page is coloured. Because the page is wet the ink drops will spread out onto the paper. Leave paper to dry
- Use the model magic to make the body for the butterfly. It may be only one body segment in a sausage shape or it may have lots of segments by joining balls together.
- Legs can be added by sticking three pieces of wire through the body and bending then at the end to form feet. Wire can also be used for antennas.
- Use a blank A4 piece of paper folded in half to draw one half of a butterflys wings ensuring that the wings start on the fold of the paper. Hold the paper up to a window to trace the wings onto the other half of the paper so that there is a symetrical butterfly.
-Cut this out to use as a template. Once the dye paper is dry trace around the template onto this paper and cut out the wings.
- Collect two pieces of wire the same length and twist then in the middle to make an x shape.
- Put the middle of the x on the middle of the bottom of the butterfly wings and pinch the middle of the butterfly wings. Attatch with sticky tape. The wire allows the wings to be flexible.
- Paint the body of the butterfly
-Attach the wings to the body using hot glue gun
Model Magic Snail


This activity has a set criteria so students know exactly what to do. Model magic is a type of clay produced by Crayola which is air drying.


Materials


One packet of model magic per student


Straw


Pencil


Paint


Procedure
-Break the model magic into two halves
-Roll both halves into balls
-Roll one ball into a short thick sausage
-Roll the other ball into a long thin sausage.
- Make the long thin sausage into a spiral and attach the spiral on top of the short thick sausage
-Add detail to the head. Pinch antennas on the head of the snail. Use a straws to make eyes. Use a pencil to make a mouth.
-Once the model magic is dried the snail can be painted.


Modroc Mask


This activity requires permission from parents as it involves putting modroc plaster onto faces it may cause a reaction in children with sensitive skin or skin conditions. This task also requires children to have trust in thier partner as some children may not feel comfortable with having their faces covered and they must trust their partner to stop the modroc application if they ask. Also make sure that student do not wash any modroc down the sink or tip the water that had the modroc in it down the sink as the modroc clogs the pipes.


Material
Vaseline
Modroc
Water in a container

Paint


Procedure
-Cut the modroc plaster into 2-3cm strips
-Half fill a container with water
-Cover a partners face with a lot of Vaseline, especially around the hairline. This with stop the modroc from sticking when it dries
-Ask your partner to lay down either on a towel on the floor or on a table
-Dip a strip of modroc into the water then starting at the top of the strip run your hand down the strip to wring out excess water.
-Place the strip on your partners face and smooth out the strip. Make sure that the student applying the modroc is very careful to avoid getting the modgoc in eyes or ears. If this occurs wipe the eye/ear and rinse out.
-Repeat this process until three layers have been applied to the face. The student may choose to have their whole face including nose and eyes covered, leave their nose and eyes uncovered or just have a section of their face covered.
-Leave the modroc on until the student can feel it starting to dry. When the student can feel it drying ask the student to wriggle their face so the modroc starts to loosen. Slowly lift the mask from the face.
-Students then swap so that the person who was applying the modroc has the modroc applied to their face
-When both partners have made their masks students can make horns, feathers etc out of modroc to add to their masks. Do this by cutting out a cardboard shape and covering it with the modroc then attaching the to the mask using modroc.
-Once the modroc has fully dried (at least 24 hours) the mask can be sandpapered back to smooth it. Ensure that it is only lightly sanded
- The mask can now be painted and decorated


Tree College


Prepare students for this activity by taking them outside to collect pieces of bark and leaves and to look at the shape of trees. Talk about the texture or how the bark feels, the multiple branches on the tree and the different colours of the bark and the leaves. Before this activity students should also know a number of college techniques and different paper types.


Materials


Various types of paper in various shades of green and brown


A3 paper


HB paper


scissors


Procedure


-Show students the tree college criteria


-Tell student they may draw their tree in pencil first before sticking on the paper or they may like to just stick the paper on.


-Students create a college of a tree using different types of paper and ensuring the tree has at least 10 branches


House Collage


It is common for students to draw a strip of sky at the top of the page and a strip of grass at the bottom so for them to understand the activity they must understand horizon. This could be done by taking students outside and letting them see that the aground meets the sky. Other work to do before this activity includes teaching students different paper skills such as layering, cutting, curling and ripping as well as teaching about different types of paper.


Materials


A2 piece of paper


Blue and green food dye


Paint brush


Paper towel


different types and colours of paper


Scissors


Procedure


-Paint the bottom third of the A2 paper with the green food dye and blot off excess dye using paper towel.


-Paint the top two thirds of the paper using the blue food dye and blot of excess using paper towel. Leave to dry.


- Talk with students about the shapes of houses for example squares, rectangles and triangles.


Ask students to create a collage of houses using different collage techniques and different types of paper. Tell students to be creative adding windows, doors, animals and plants to their collage.


Above are some collage techniques
Monet water lilies


This is a variation on candle wax drawing using wax crayons instead of candle wax. This activity is named after Claude Monet who did a series of 250 water lily impressionist paintings.


Materials


A4 paper


Scissors


HB pencil


Wax crayons


Blue food dye


Procedure


- Hold the A4 paper landscape orientation. Fold the bottom left corner to the top edge of the paper.


-Cut off the small rectangle on the right side of the paper. Unfold the paper and you should have a square.


-One the square piece of paper use a HB pencil to draw a flower which takes up most of the paper. Draw the flower sitting on a lily pad.


-Once the flower and Lilly pad is drawn colour it in using wax crayons.


-Scrunch the picture up multiple times until the paper becomes soft.


- Flatten the picture out and paint over the whole picture using blue food dye. Soak up excess dye with paper towel.


-Iron the back of the picture to get rid of any creases